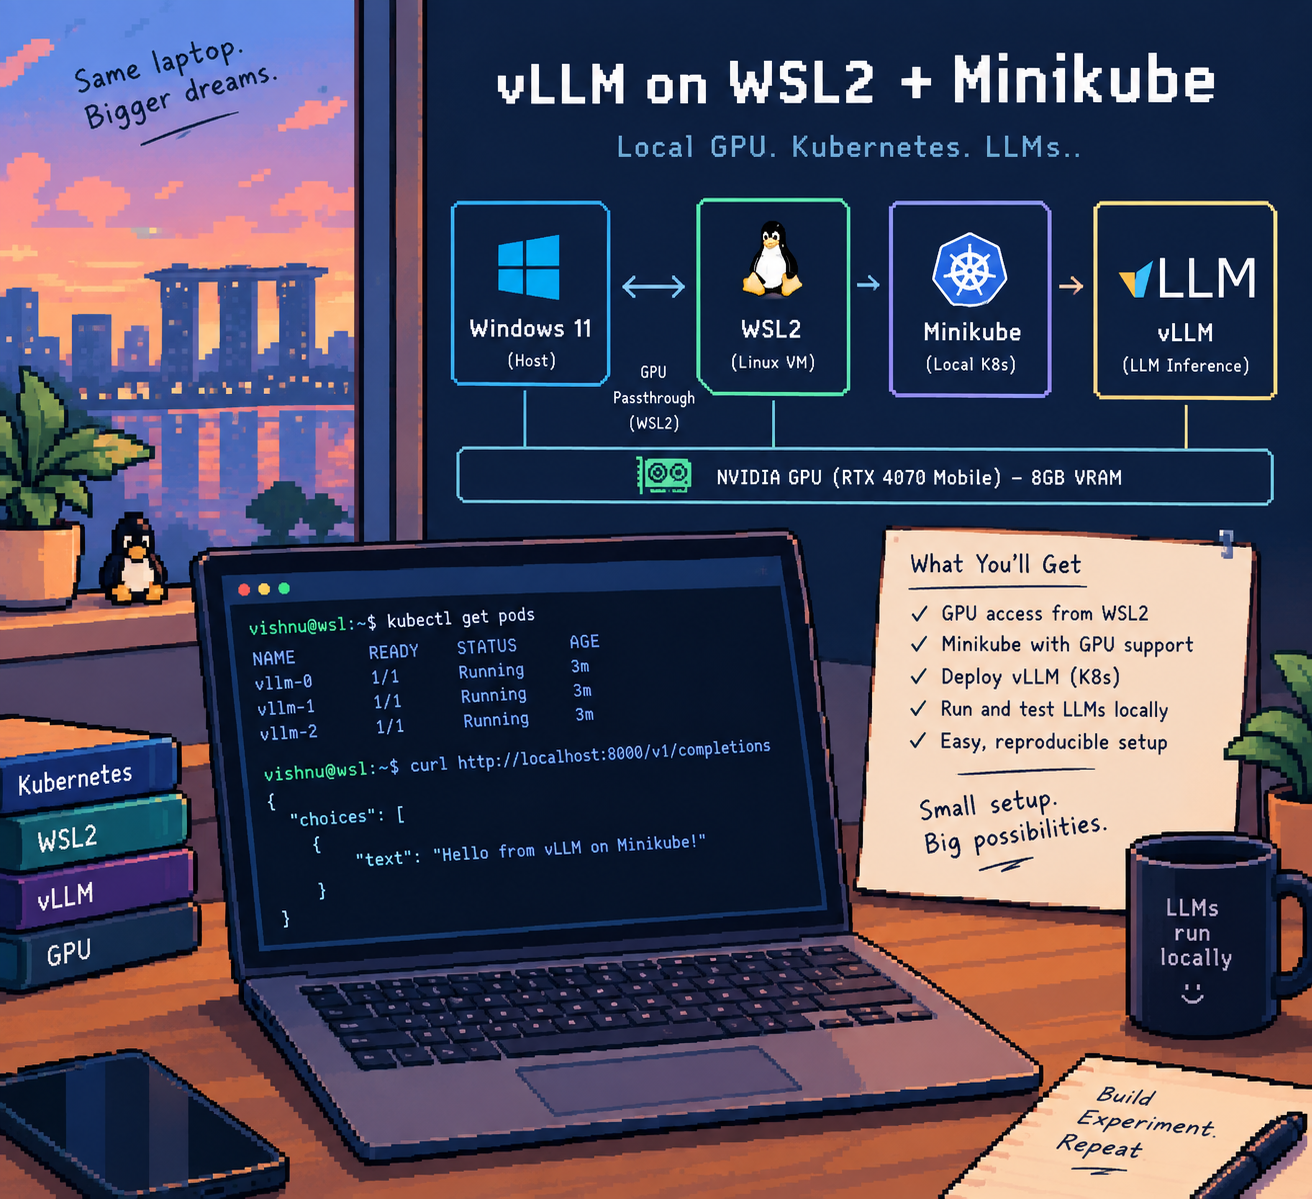
This is the vLLM entry in my local AI series. After testing Ollama, llama.cpp, and FreeToken, I wanted to run vLLM as a Kubernetes Deployment on my Windows/WSL2 setup.
The plan was simple: deploy vLLM, request nvidia.com/gpu: 1, expose an OpenAI-compatible API endpoint through a Service, and tie it into the Kubernetes workflows I write about regularly.
Getting a GPU into Kubernetes on WSL2 turned into an investigation. Not because vLLM is hard, but because container runtimes and nested clusters handle GPU passthrough in non-obvious ways. Here is what happened, how the device plugin and node prerequisites work, and how to get a working GPU cluster running with Minikube.
What You’ll Build#
Windows
   │
   ▼
WSL2 Ubuntu
   │
   ▼
Docker Engine + NVIDIA Container Toolkit
   │
   ▼
Minikube
   │
   ▼
Kubernetes
   │
   ├── NVIDIA GPU Operator
   │
   ├── NVIDIA Device Plugin
   │
   └── vLLM
         │
         ▼
      NVIDIA GPU
By the end of this guide, you’ll have vLLM running on Kubernetes with GPU acceleration and serving an OpenAI-compatible API.
The Test Rig#
My test machine for this run:
- Host Machine: Windows 11 Laptop
- GPU: NVIDIA GeForce RTX 4070 Laptop GPU (8.0 GiB VRAM)
- Host Memory: 32 GB DDR5
- WSL2 Environment: Ubuntu 24.04 LTS (noble) with systemd enabled
- NVIDIA Drivers: Driver version 616.56 / CUDA 13.4 user-mode driver
- Kubernetes: Minikube v1.39.0 provisioning Kubernetes v1.37.0
- Model: Qwen3.5-0.8B (
Qwen/Qwen3.5-0.8B) served by vLLM v0.28.0
Troubleshooting vLLM GPU Support on Docker Desktop WSL2 Kubernetes#
Docker Desktop offers a one-click Kubernetes cluster in its settings. Turning it on provisions a single-node cluster named desktop-control-plane running on containerd://2.3.4.
On the WSL2 host, nvidia-smi works fine, and running standalone GPU containers (docker run --gpus all) works without issues. The next step was applying the standard NVIDIA Kubernetes device plugin DaemonSet to enable GPU scheduling:
kubectl create -f https://raw.githubusercontent.com/NVIDIA/k8s-device-plugin/v0.16.2/deployments/static/nvidia-device-plugin.yml
The DaemonSet pod started, but immediately stalled in a retry loop:
E... Incompatible strategy detected auto
E... If this is a GPU node, did you configure the NVIDIA Container Toolkit?
I... No devices found. Waiting indefinitely.
Checking the node capacity confirmed the issue:
kubectl describe node desktop-control-plane | grep -A5 "Capacity:\|Allocatable:"
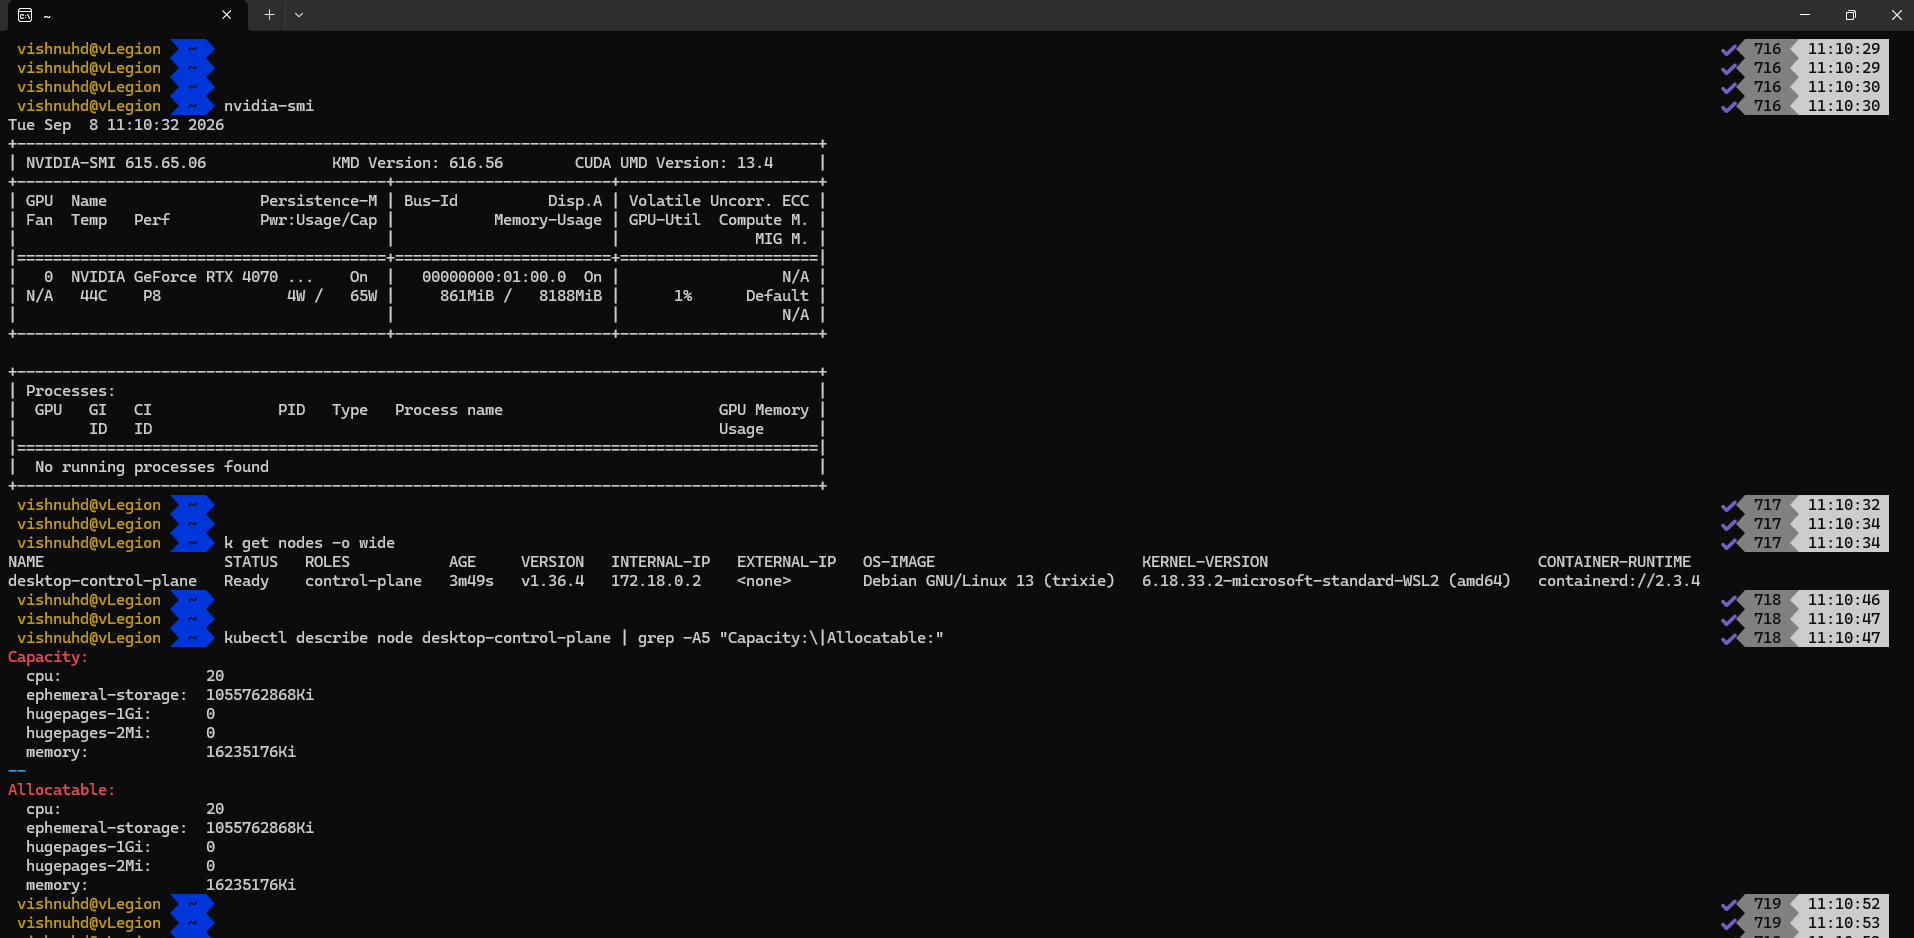
Checking Docker Desktop’s desktop-control-plane: nvidia-smi finds the RTX 4070, but the node exposes zero GPU capacity.
In this tested Docker Desktop Kubernetes setup, GPU resources were not exposed to the Kubernetes node. Despite GPU access working in WSL2 and standalone Docker containers, the Kubernetes node could not expose nvidia.com/gpu to the device plugin.
How Kubernetes Detects NVIDIA GPUs Using the NVIDIA Device Plugin#
The NVIDIA Kubernetes Device Plugin is a DaemonSet that exposes GPU hardware to the Kubernetes control plane. It does not run inference, and it does not install drivers or container runtimes.
Under standard Kubernetes GPU scheduling, pods request GPU resources by specifying limits for extended resources. The device plugin integrates with Kubelet through the Kubernetes Device Plugin API over gRPC, using a Unix domain socket at /var/lib/kubelet/device-plugins/kubelet.sock. Its responsibility comes down to three functions:
- Discovery: The plugin queries the host system using NVML (NVIDIA Management Library) to check how many physical GPUs are present and verify their health status.
- Registration: It registers with Kubelet and advertises the discovered GPUs as an extended allocatable resource named
nvidia.com/gpu. - Allocation: When a pod requesting
nvidia.com/gpu: 1gets scheduled to the node, Kubelet calls the plugin’sAllocategRPC endpoint. The plugin picks a healthy GPU and sends back the device IDs and environment variables (NVIDIA_VISIBLE_DEVICES=<UUID>) to Kubelet. Kubelet then passes those variables to the container runtime so the container gets access to/dev/nvidia*.
Worker Node Prerequisites#
Because the device plugin only handles discovery and Kubelet registration, it assumes the worker node already has a functional GPU stack. For worker nodes in any Kubernetes cluster, three layers must be in place before the device plugin can run:
- Host Kernel Drivers: The node OS must have the NVIDIA kernel modules loaded (
nvidia.ko,nvidia-uvm.ko) and device nodes created in/dev. Runningnvidia-smion the host must return clean output. - NVIDIA Container Toolkit: Packages such as
libnvidia-containerandnvidia-container-toolkitmust be installed on the host. Refer to the NVIDIA Container Toolkit install guide for distribution setup. This toolkit includes the OCI prestart hook that inspects container environment variables and mounts host GPU driver libraries into the target container. - Runtime Configuration: The node container runtime (containerd or Docker) must have the NVIDIA runtime configured in its daemon settings (such as
/etc/containerd/config.tomlor/etc/docker/daemon.json) and set up to handle CDI (Container Device Interface) or NVIDIA runtime hooks.
If any of those three pieces is missing or unconfigured, the device plugin pod will fail during startup or report zero allocatable GPUs.
Why Docker Desktop Kubernetes Cannot Detect My NVIDIA GPU#
Based on the runtime architecture observed in this setup, the issue comes down to how Docker Desktop isolates its cluster node.
desktop-control-plane runs inside Docker Desktop’s private utility VM (docker-desktop), isolated using sysbox-runc rather than the standard OCI runtime runc. Sysbox provides nested container virtualization to spin up systemd, kubelet, and containerd within an unprivileged container environment.
In this setup, that isolation layer prevents GPU passthrough:
- Missing OCI Passthrough: The node container was not launched with NVIDIA GPU passthrough flags (
--gpus all). Inside the sandbox, containerd cannot access NVIDIA device nodes (/dev/nvidia*) or the WSL2 DirectX driver mapping (/usr/lib/wsl/lib). - Locked-Down Lifecycle: You cannot configure the NVIDIA Container Toolkit inside the node’s containerd because Docker Desktop internally supervises the container.
- Daemon Defaults Do Not Propagate: Setting
nvidiaas the default OCI runtime indocker-desktopWSL does not alter thesysbox-runcruntime used by the Kubernetes node container.
Docker has an open roadmap issue requesting native GPU passthrough for Docker Desktop Kubernetes. It remains an architectural boundary in the current setup.
Because of these issues, I pivoted to running Minikube with WSL2 using native Docker.
Installing Docker CE and Containerd Inside WSL2#
To satisfy those node prerequisites and bypass Docker Desktop’s VM isolation, we install the native Docker Community Edition engine directly inside the Ubuntu 24.04 WSL2 environment:
# Add Docker's official GPG key
sudo mkdir -p /etc/apt/keyrings
sudo curl -fsSL https://download.docker.com/linux/ubuntu/gpg -o /etc/apt/keyrings/docker.asc
sudo chmod a+r /etc/apt/keyrings/docker.asc

# Set up the repository
echo \
  "deb [arch=$(dpkg --print-architecture) signed-by=/etc/apt/keyrings/docker.asc] https://download.docker.com/linux/ubuntu noble stable" | \
  sudo tee /etc/apt/sources.list.d/docker.list > /dev/null

# Install Docker CE and containerd
sudo apt update
sudo apt install docker-ce docker-ce-cli containerd.io docker-buildx-plugin docker-compose-plugin
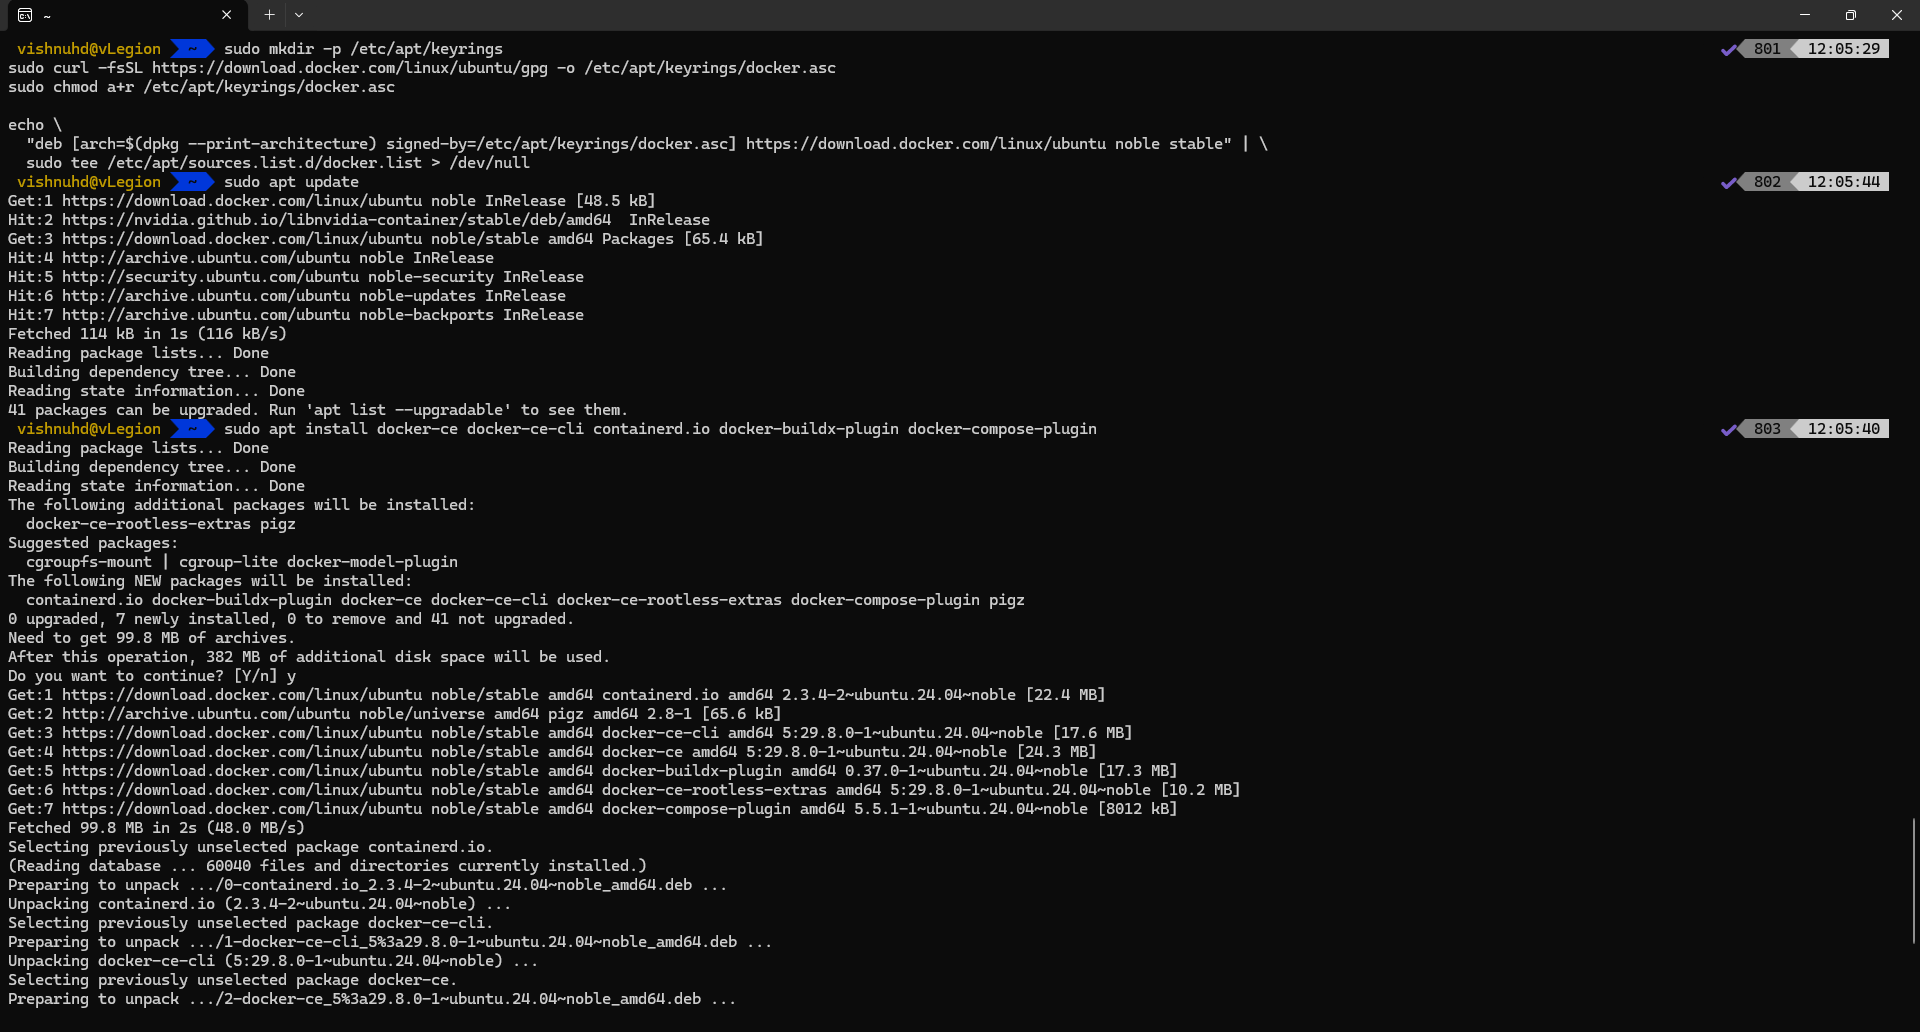
Configuring the official Docker CE repository and installing containerd and the Docker daemon inside Ubuntu WSL2.
Verify that both the Docker daemon and containerd services are running cleanly under systemd:
systemctl status docker
systemctl status containerd
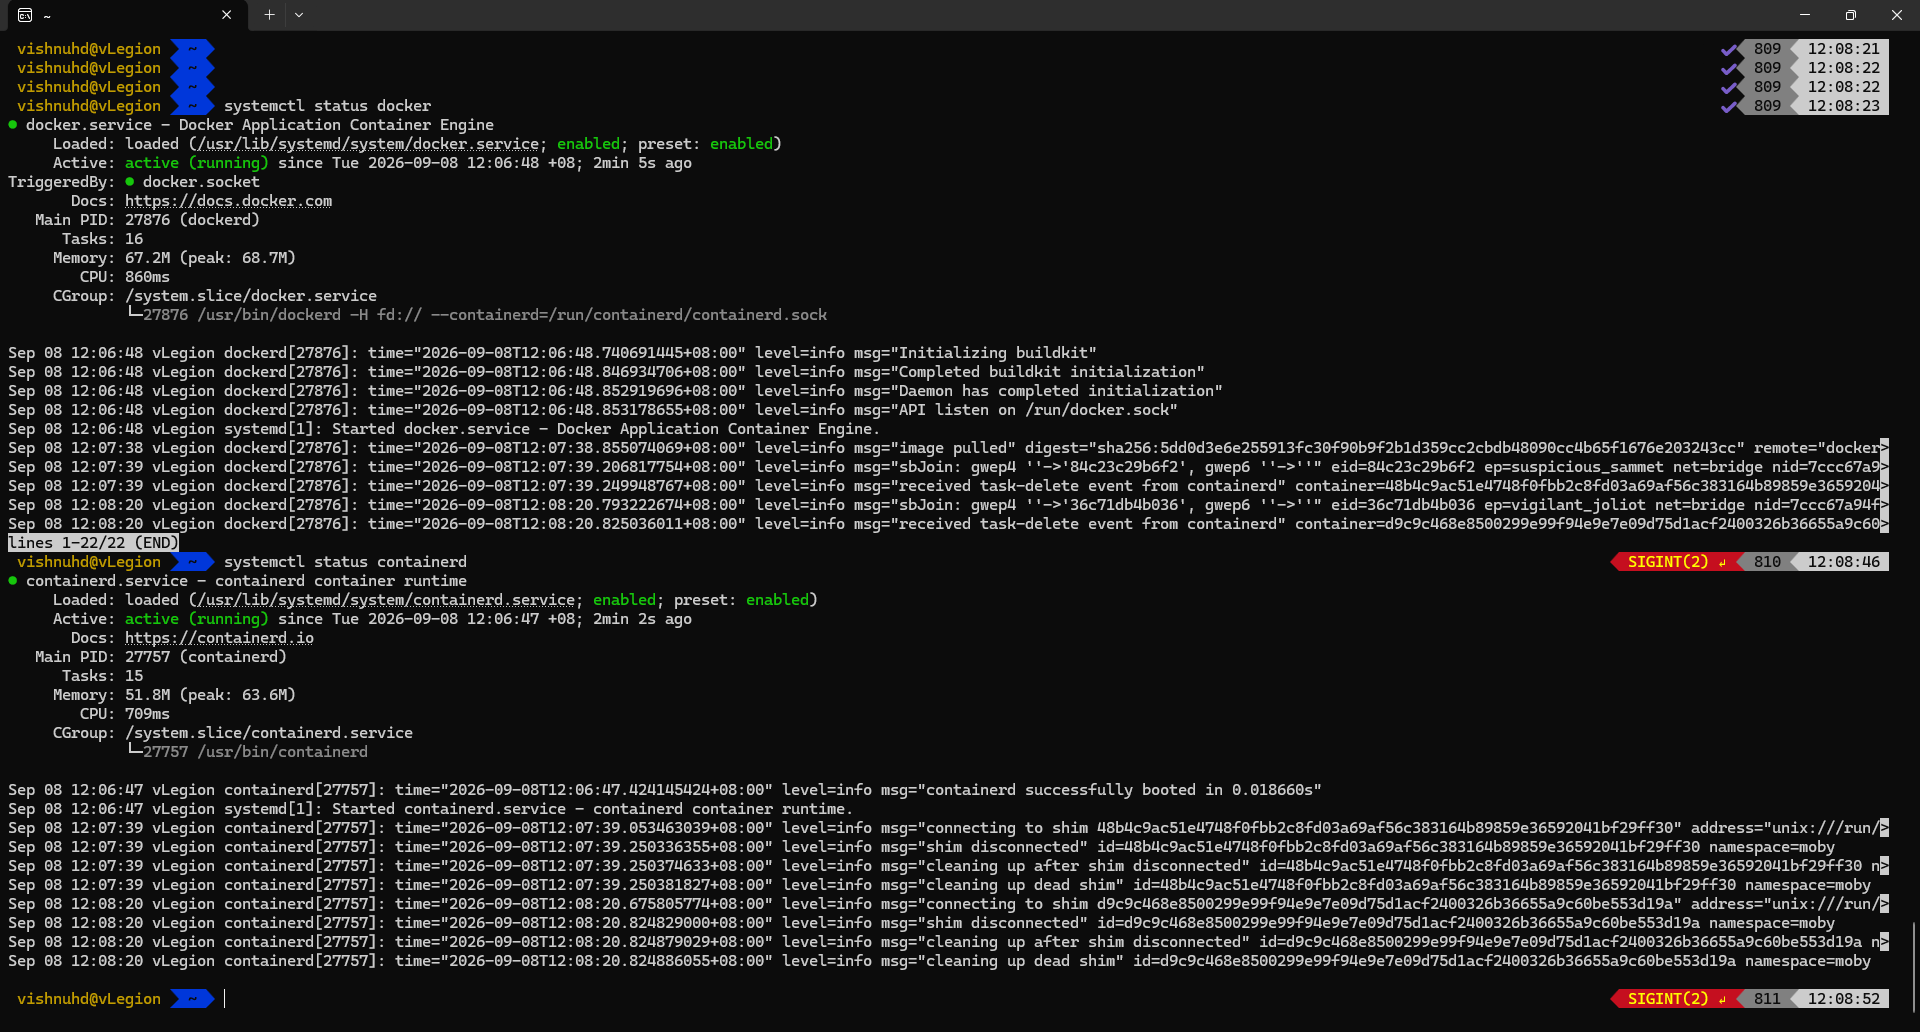
Confirming active (running) status for both docker.service and containerd.service under WSL2 systemd.
Before moving to Kubernetes, sanity check that native Docker has full GPU access through the WSL2 NVIDIA container runtime:
docker container run --gpus all --rm nvidia/cuda:13.3.1-base-ubuntu26.04 nvidia-smi -L
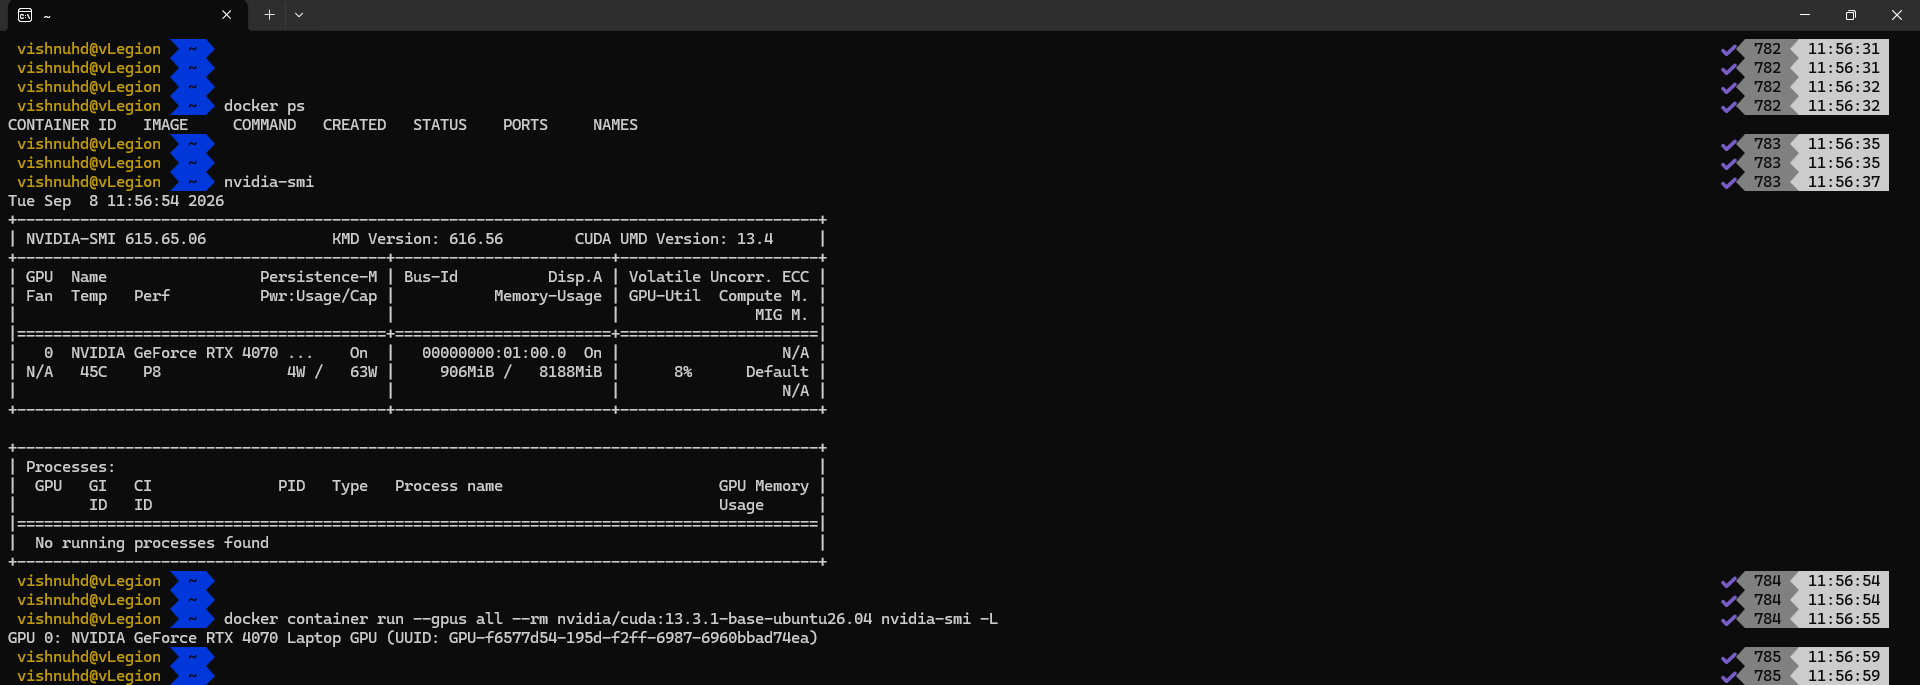
Direct GPU passthrough test: Docker successfully identifies GPU 0 as the NVIDIA GeForce RTX 4070 Laptop GPU.
Run Minikube with NVIDIA GPU Support on WSL2#
Install the latest Minikube Debian package:
curl -LO https://storage.googleapis.com/minikube/releases/latest/minikube_latest_amd64.deb
sudo dpkg -i minikube_latest_amd64.deb
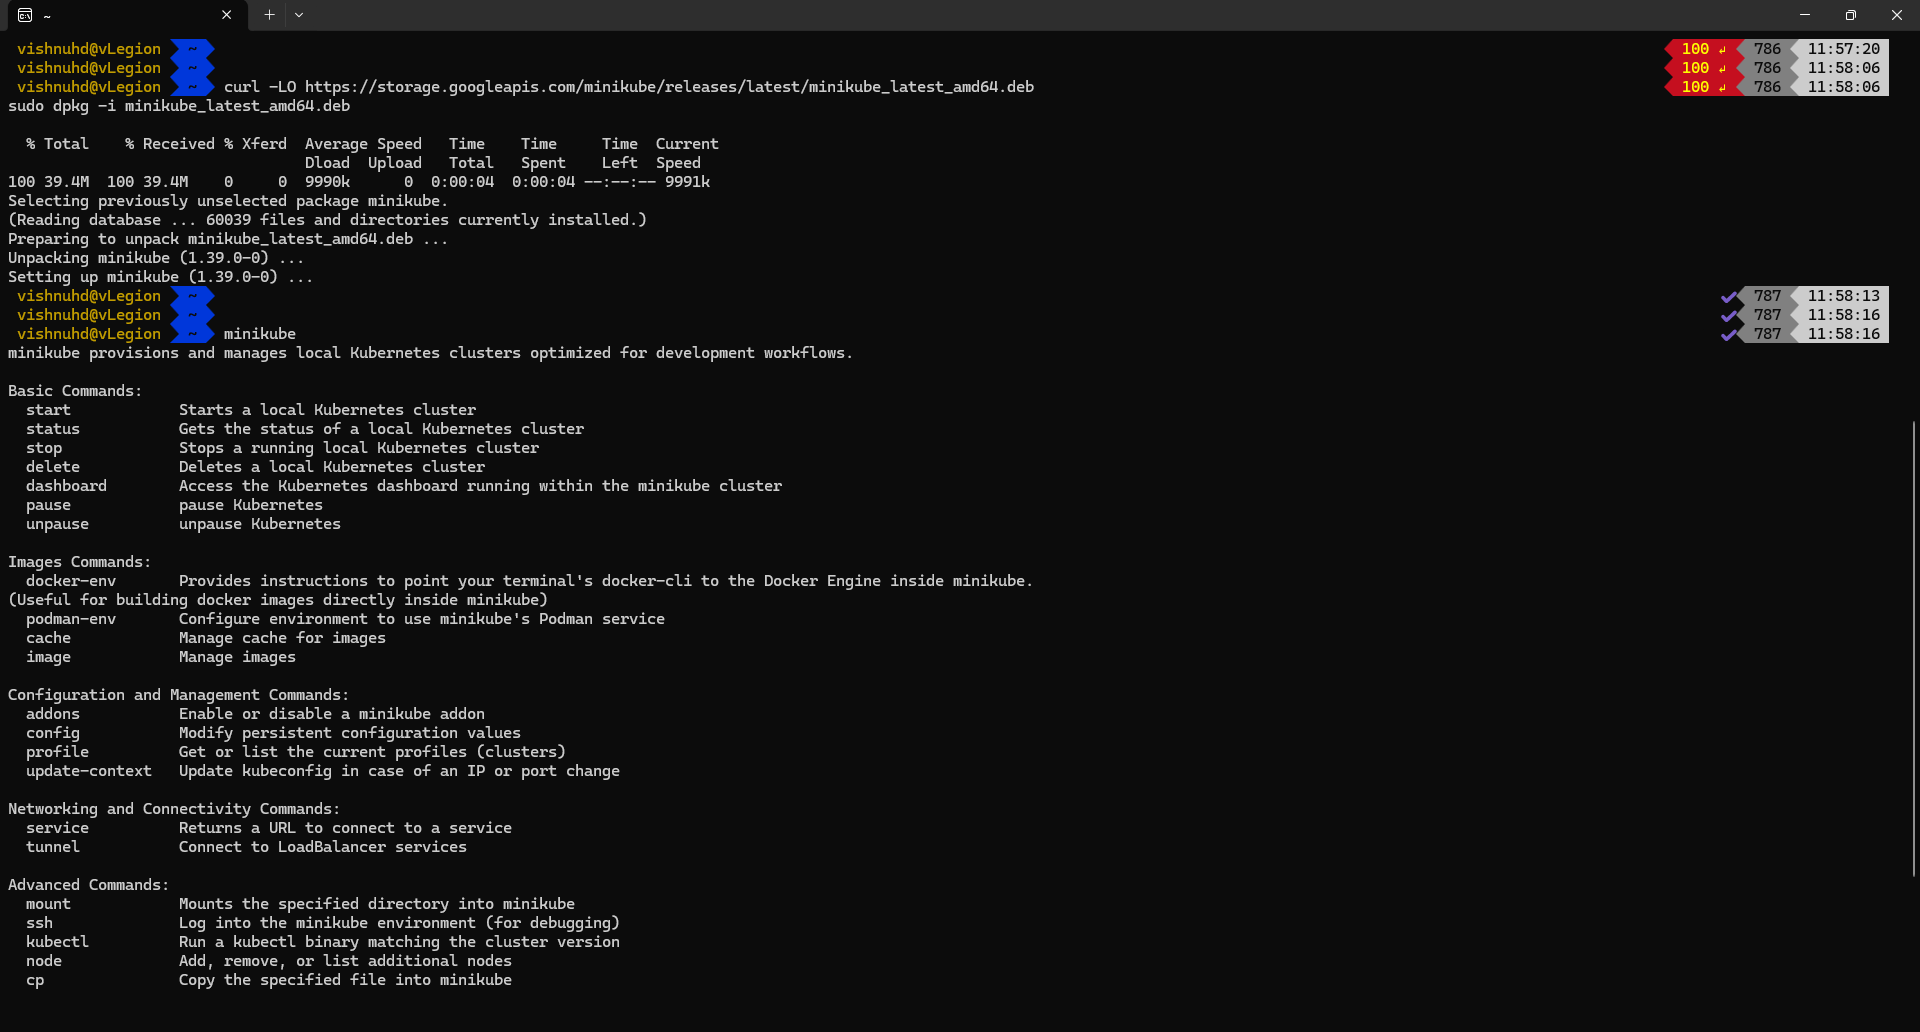
Installing Minikube v1.39.0 via Debian package.
Following the official Minikube GPU documentation, starting Minikube with GPU acceleration requires specific driver and runtime parameters. Now start Minikube. Two flags matter here and both are easy to miss:
minikube start \
  --driver=docker \
  --container-runtime=docker \
  --gpus=all \
  --memory=12g \
  --cpus=10 \
  --extra-config=apiserver.service-account-issuer=https://kubernetes.default.svc \
  --extra-config=apiserver.service-account-signing-key-file=/var/lib/minikube/certs/sa.key
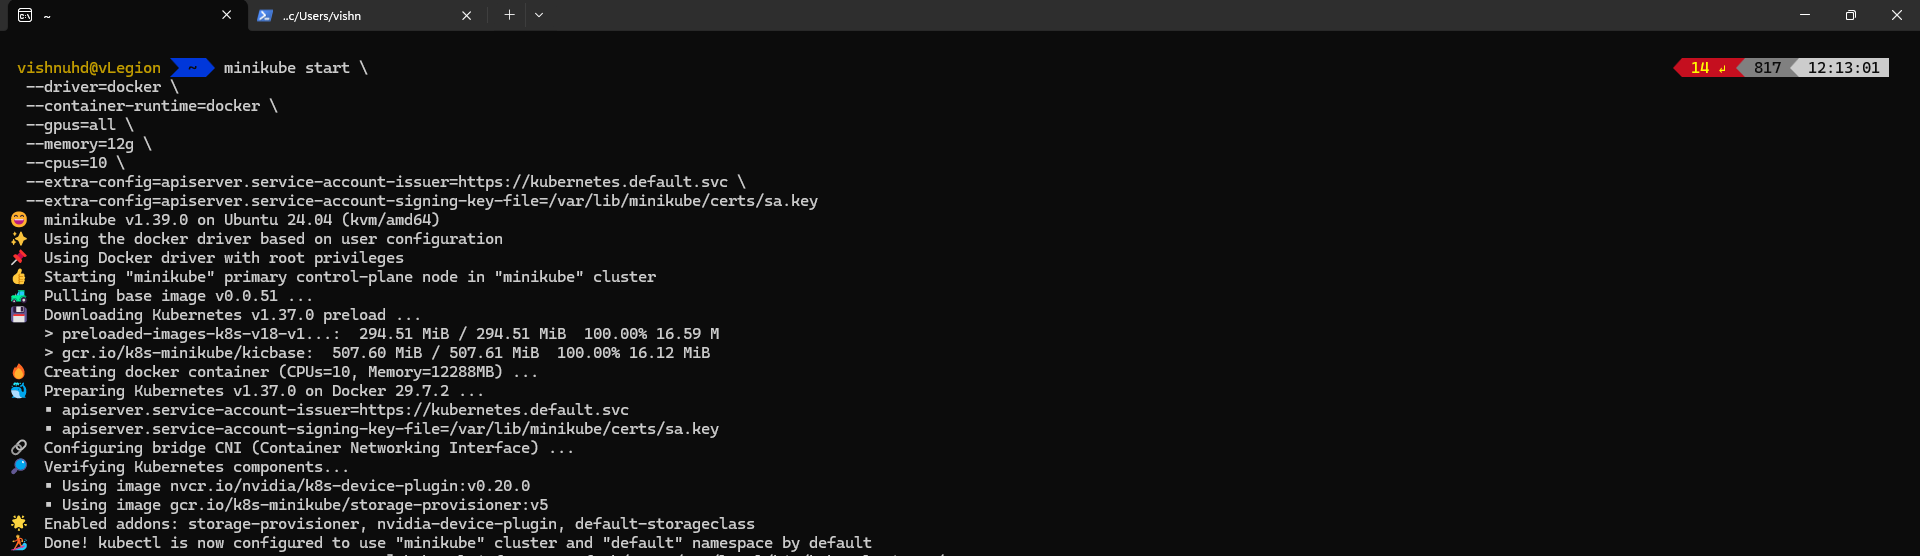
Minikube starting Kubernetes v1.37.0 on Docker, automatically detecting and enabling the nvidia-device-plugin addon.
[!IMPORTANT] Why
--container-runtime=dockeris required: By default, even when using--driver=docker, Minikube configures containerd as its internal in-node runtime. However, Minikube’s--gpus=allflag currently hooks into Docker’s OCI runtime wrapper. If you omit--container-runtime=docker, Minikube fails during preflight checks with an invalid flag combination error.
Notice the startup output: Minikube automatically detects the GPU and enables the nvidia-device-plugin addon for you.
Verifying the Cluster and GPU Allocation#
Install kubectl to talk to the cluster:
curl -LO "https://dl.k8s.io/release/$(curl -L -s https://dl.k8s.io/release/stable.txt)/bin/linux/amd64/kubectl"
sudo install -o root -g root -m 0755 kubectl /usr/local/bin/kubectl
kubectl version --client
kubectl get nodes
kubectl get pods -A
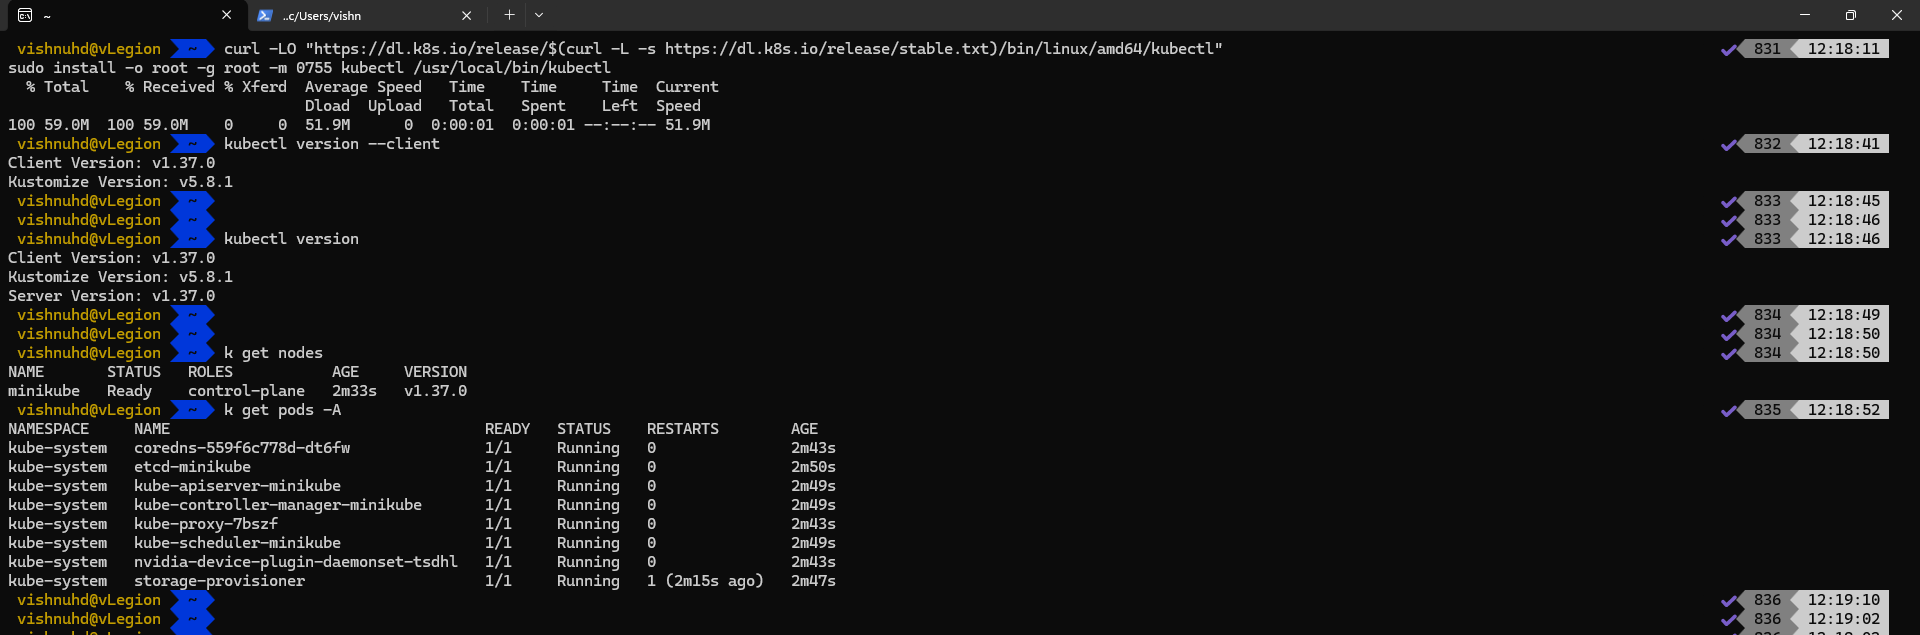
Node minikube is Ready (v1.37.0) and the nvidia-device-plugin-daemonset is 1/1 Running in kube-system.
Next, inspect the node’s schedulable capacity:
kubectl describe node minikube | grep -A7 "Capacity:\|Allocatable:"
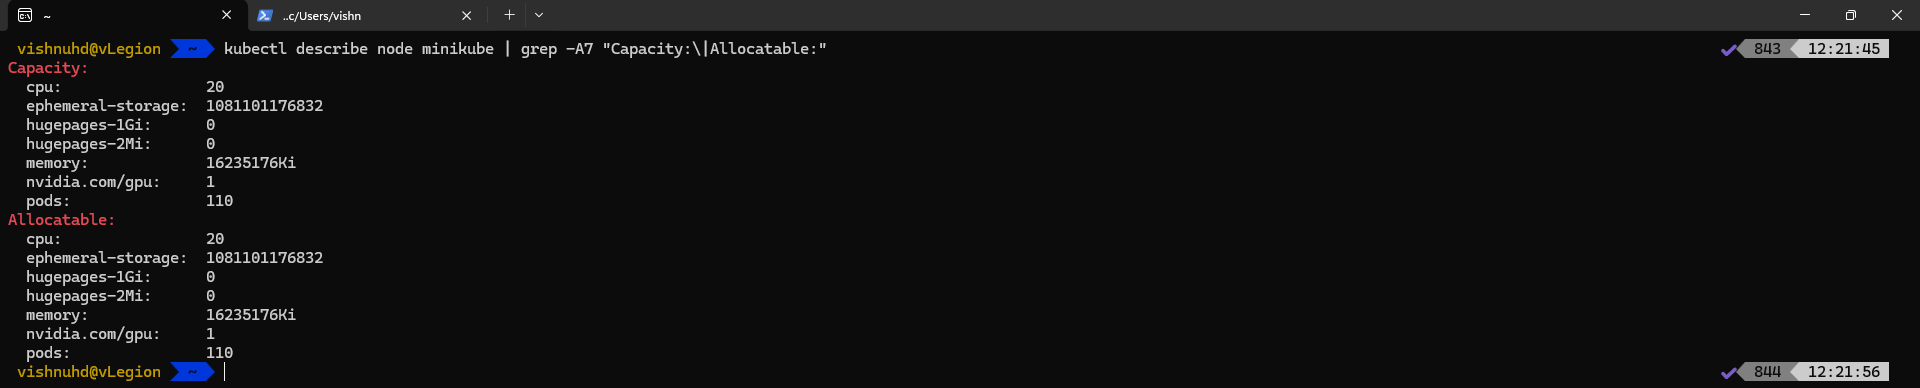
Cluster verification: nvidia.com/gpu: 1 is now officially registered in Capacity and Allocatable.
A quick test pod confirms the GPU is reachable from inside Kubernetes:
cat <<EOF | kubectl apply -f -
apiVersion: v1
kind: Pod
metadata:
  name: gpu-test
spec:
  restartPolicy: Never
  containers:
    - name: cuda-test
      image: nvidia/cuda:13.3.1-base-ubuntu26.04
      command: ["nvidia-smi", "-L"]
      resources:
        limits:
          nvidia.com/gpu: 1
EOF
Check the test pod logs:
kubectl logs gpu-test
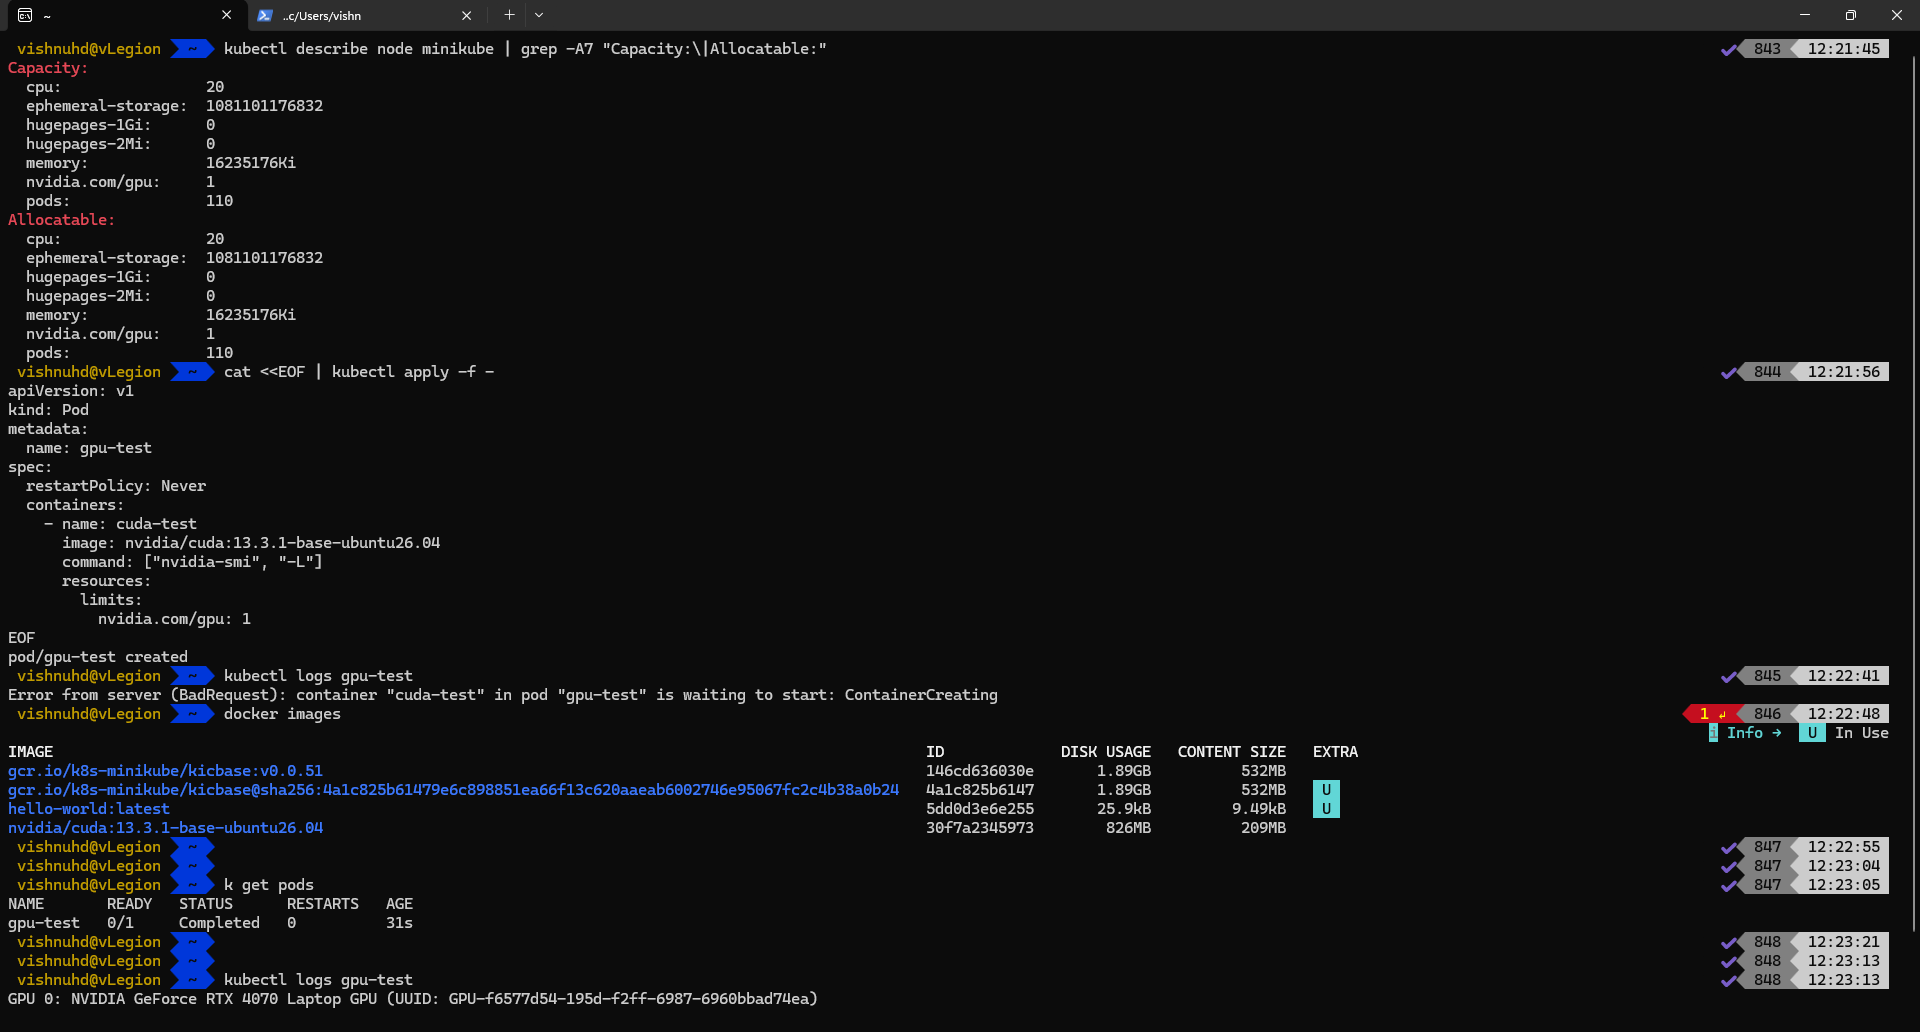
Test pod running nvidia-smi inside the Kubernetes cluster and successfully accessing the RTX 4070.
Real GPU scheduling and nvidia.com/gpu resource accounting, without Docker Desktop getting in the way.
Deploy vLLM on Kubernetes with NVIDIA GPU#
Model choice for 8 GB VRAM: Qwen3.5-0.8B (Qwen/Qwen3.5-0.8B). Small enough to leave real headroom for vLLM’s KV cache, which is the main reason to use vLLM over llama.cpp or Ollama in the first place, and it is a capable model at that size. As detailed in the vLLM documentation, the server exposes an OpenAI-compatible API endpoint over HTTP.
The Shared Memory (/dev/shm) Gotcha#
When running vLLM via the Docker CLI, passing --ipc=host lets workers exchange tensors and state across processes using host shared memory. In Kubernetes, pods do not share the host IPC namespace by default, and Kubernetes provisions /dev/shm as a minimal 64 MB tmpfs mount.
Some PyTorch and vLLM multiprocessing workloads can require significantly more shared memory than Kubernetes’ default /dev/shm (which defaults to a minimal 64 MB tmpfs mount). If insufficient shared memory is available, initialization or worker processes may fail. The Kubernetes solution is mounting an emptyDir volume backed by host RAM (medium: Memory) with a dedicated sizeLimit:
# vllm-qwen-k8s.yaml
apiVersion: apps/v1
kind: Deployment
metadata:
  name: vllm-qwen
  labels:
    app: vllm-qwen
spec:
  replicas: 1
  selector:
    matchLabels:
      app: vllm-qwen
  template:
    metadata:
      labels:
        app: vllm-qwen
    spec:
      containers:
        - name: vllm
          image: vllm/vllm-openai:v0.28.0
          args:
            - "--model=Qwen/Qwen3.5-0.8B"
            - "--gpu-memory-utilization=0.7"
            - "--max-model-len=8192"
          ports:
            - containerPort: 8000
          resources:
            limits:
              nvidia.com/gpu: 1
          volumeMounts:
            - name: hf-cache
              mountPath: /root/.cache/huggingface
            - name: dshm
              mountPath: /dev/shm
      volumes:
        - name: hf-cache
          emptyDir: {}
        - name: dshm
          emptyDir:
            medium: Memory
            sizeLimit: 2Gi
---
apiVersion: v1
kind: Service
metadata:
  name: vllm-qwen
spec:
  selector:
    app: vllm-qwen
  ports:
    - port: 8000
      targetPort: 8000
  type: ClusterIP
Two practical notes on this manifest:
- Image version pinning: I pin the image version (
v0.28.0) here so the deployment remains reproducible. You can update the image tag after validating compatibility with your CUDA and model version. - Hugging Face cache:
emptyDiris used here for simplicity. The Hugging Face model cache is lost when the pod is recreated. For repeated testing or larger models, consider using a PersistentVolumeClaim (PVC) or a host-mounted path.
Apply the manifest and watch the deployment roll out:
kubectl apply -f vllm-qwen-k8s.yaml
kubectl get pods,svc
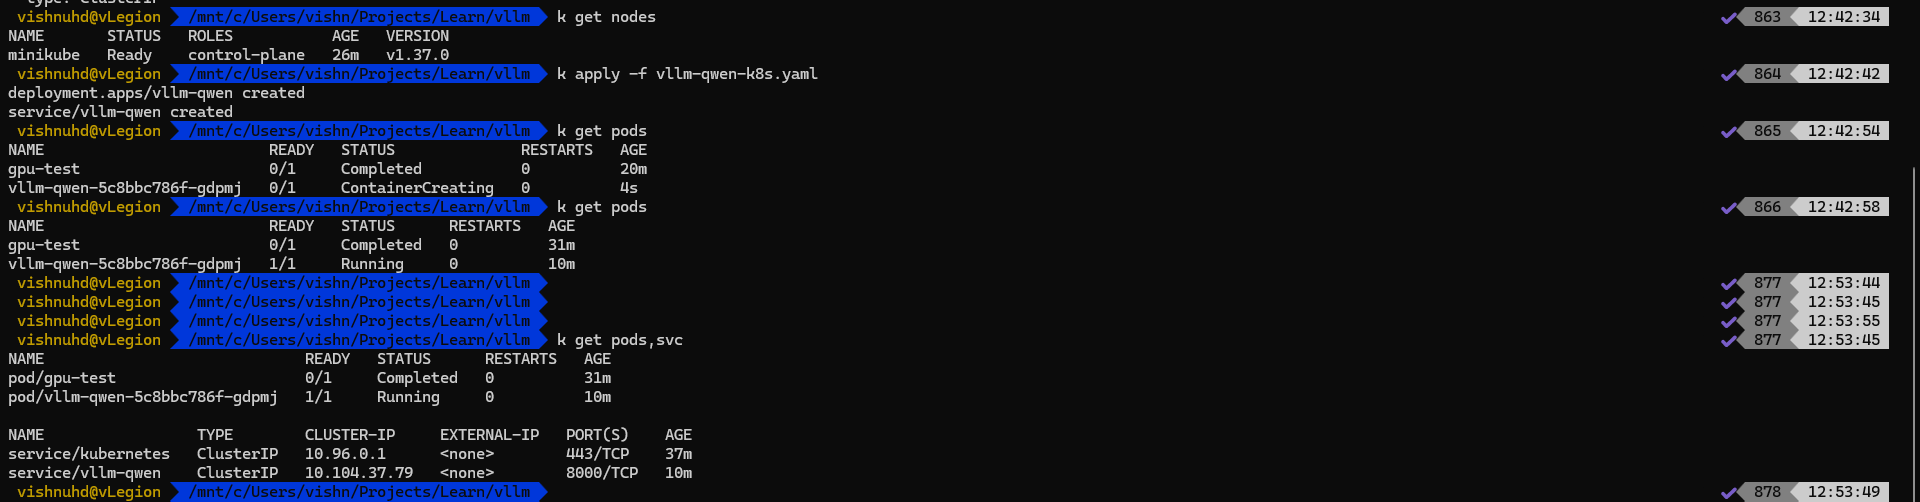
Applying vllm-qwen-k8s.yaml and confirming the vLLM pod reaches 1/1 Running status alongside the ClusterIP service.
Stream the pod logs to inspect the vLLM initialization sequence:
kubectl logs vllm-qwen-5c8bbc786f-gdpmj -f
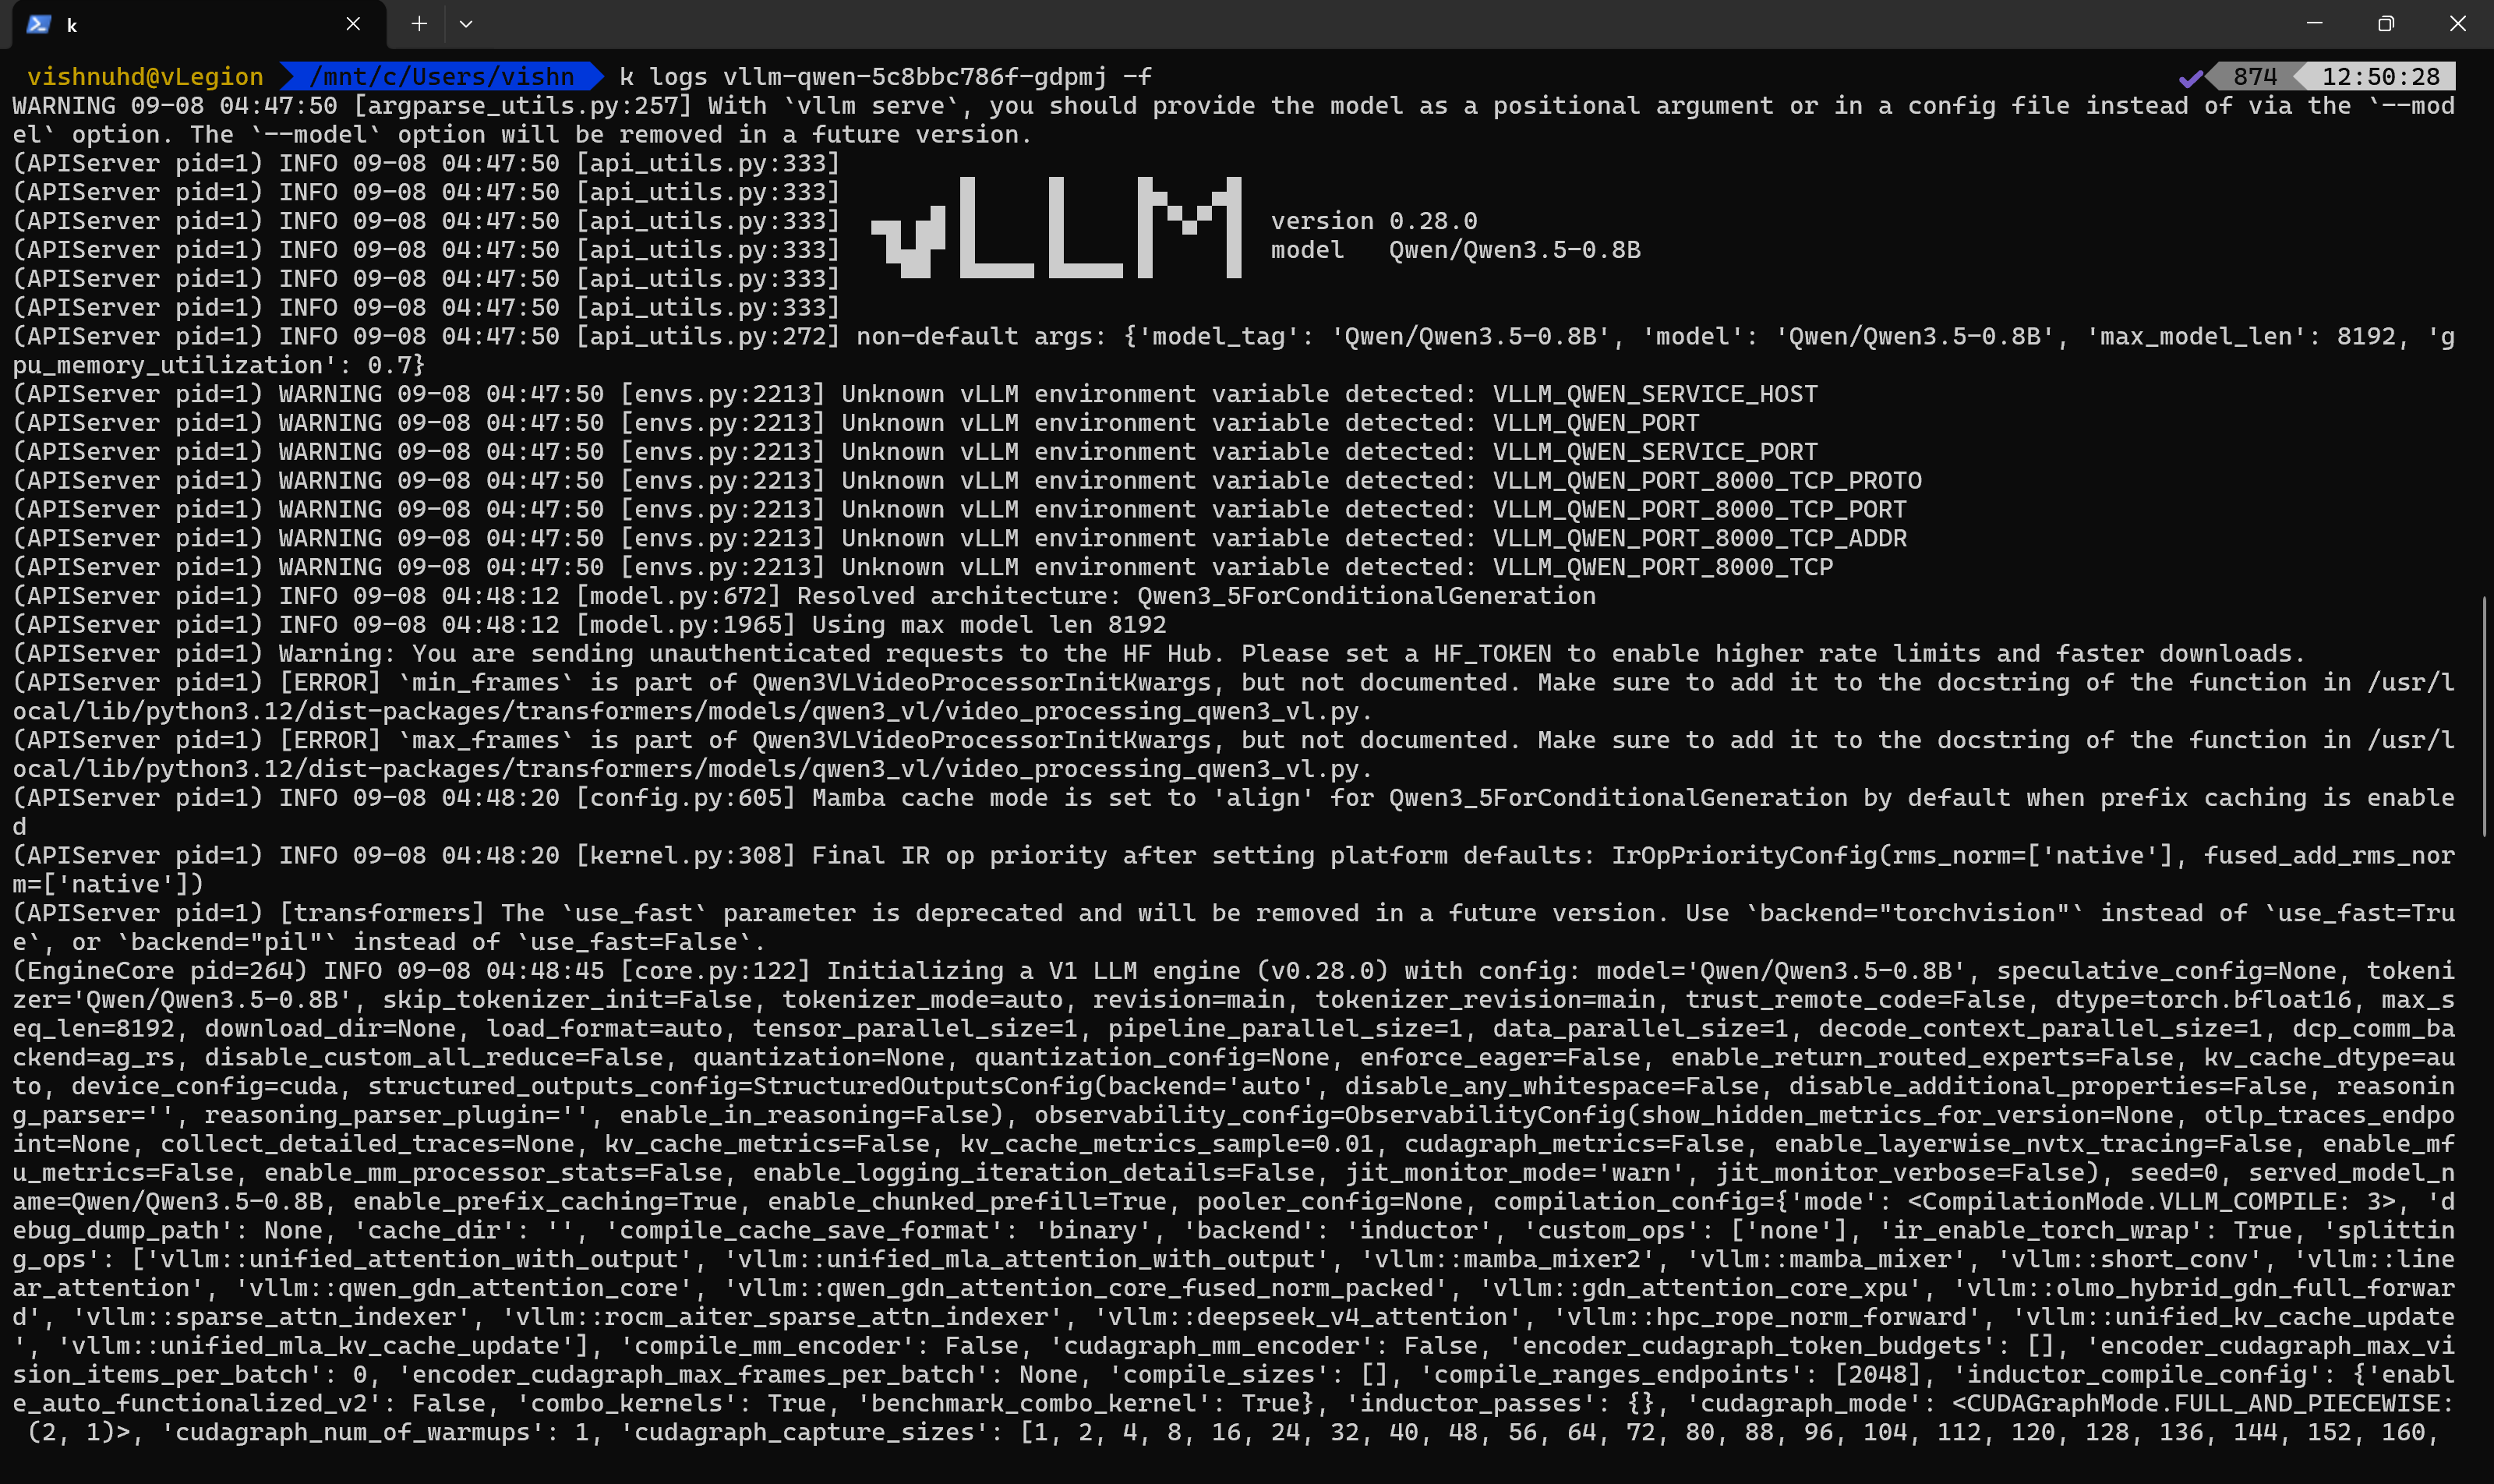
vLLM v0.28.0 engine initialization: resolving Qwen3_5ForConditionalGeneration, setting max model length to 8192, and warming up CUDA graphs.
Once PyTorch compilation and CUDA graph capture finish, the ASGI application completes startup and begins listening on port 8000:
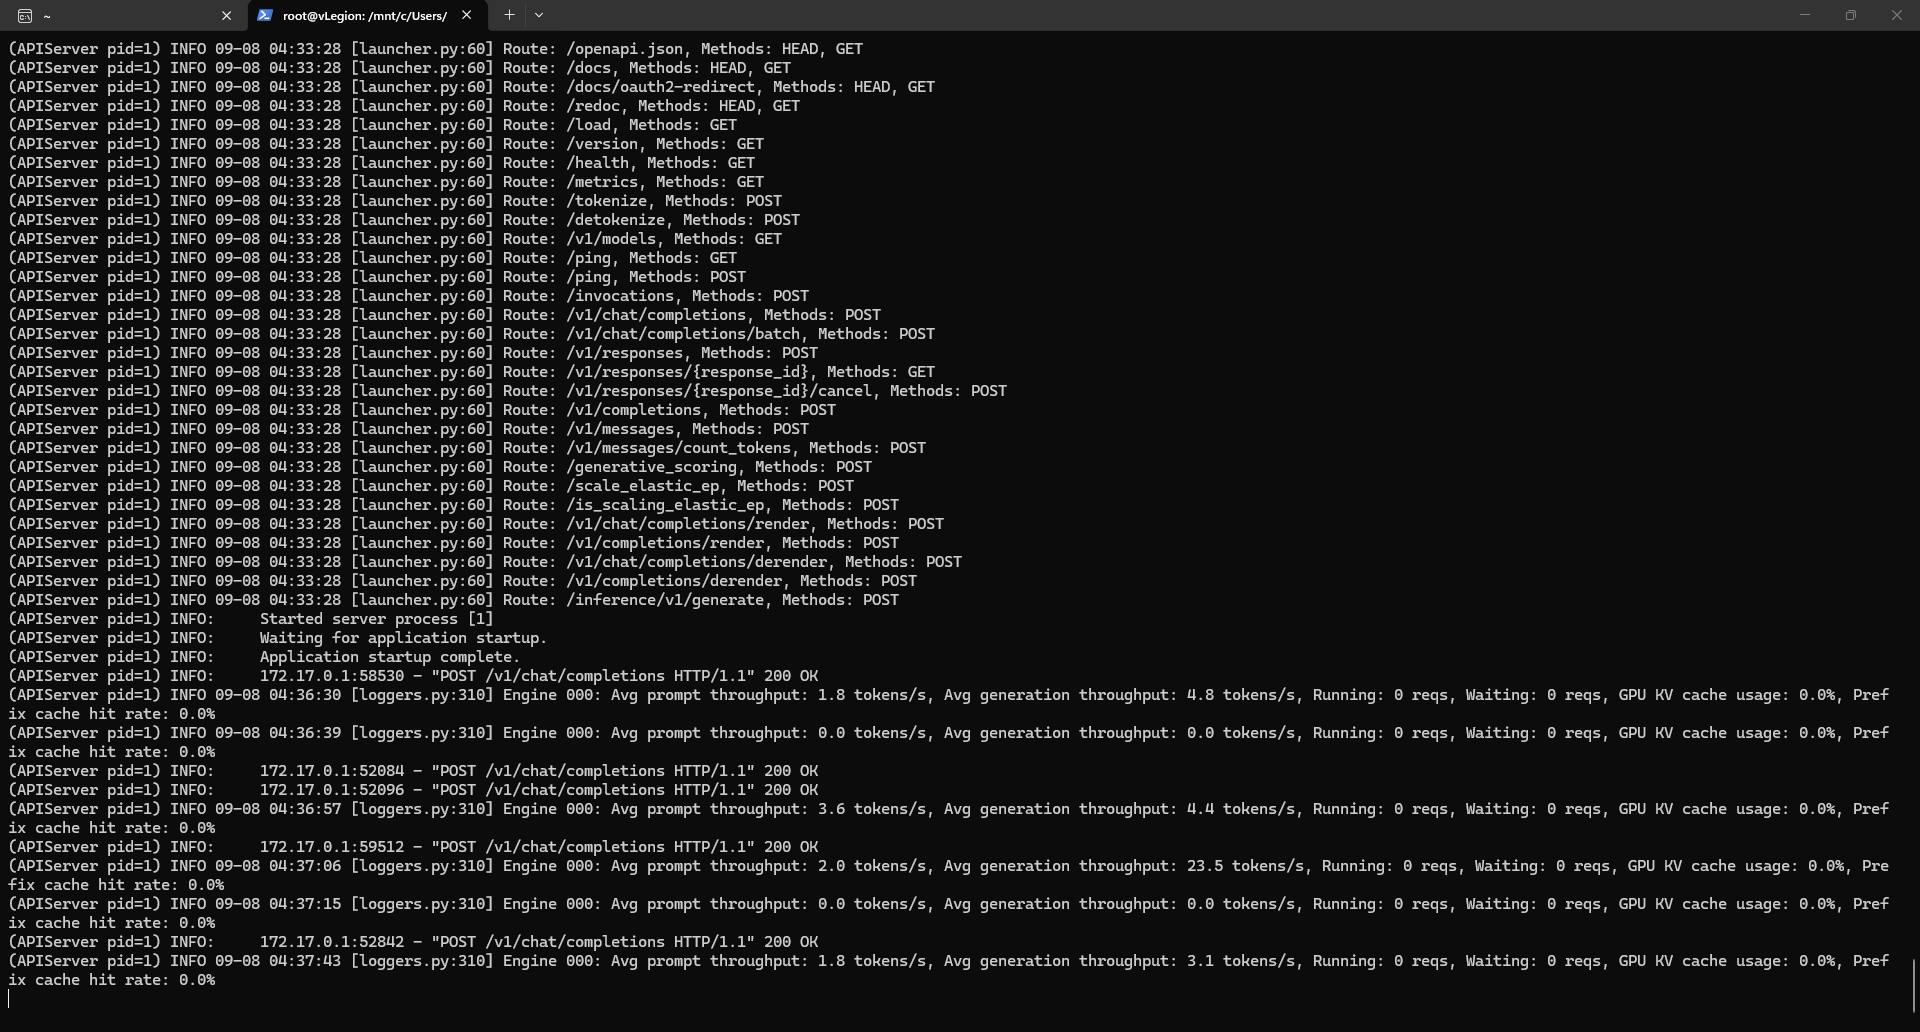
vLLM application startup complete: exposing OpenAI-compatible endpoints (/v1/chat/completions) with live throughput metrics.
Testing Inference and Hardware Telemetry#
Forward port 8000 from the cluster service to the local machine:
kubectl port-forward svc/vllm-qwen 8000:8000
Now issue an OpenAI-standard chat completion request using curl:
curl http://localhost:8000/v1/chat/completions \
  -H "Content-Type: application/json" \
  -d '{
    "model": "Qwen/Qwen3.5-0.8B",
    "messages": [{"role": "user", "content": "Say hello in one sentence."}]
  }'
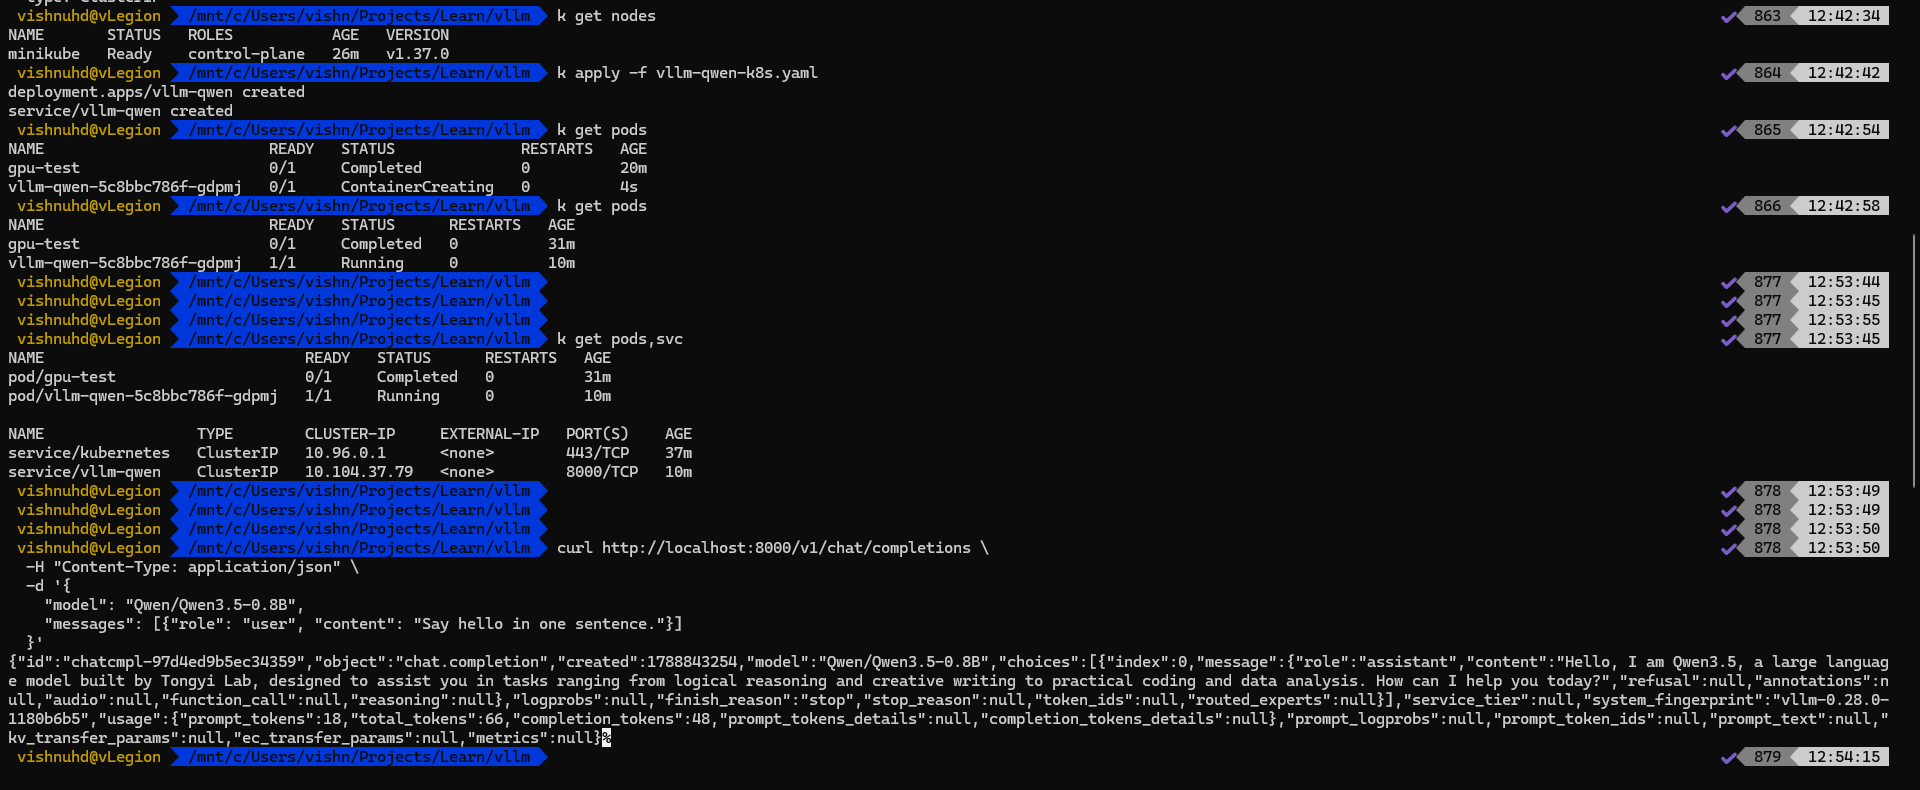
Inference test: 48 tokens generated cleanly through the OpenAI-compatible vLLM API running in Minikube.
The response returned without issues, with server logs showing generation throughput averaging 23.5 tokens/s.
Finally, checking Windows Task Manager confirms the hardware utilization on the host:
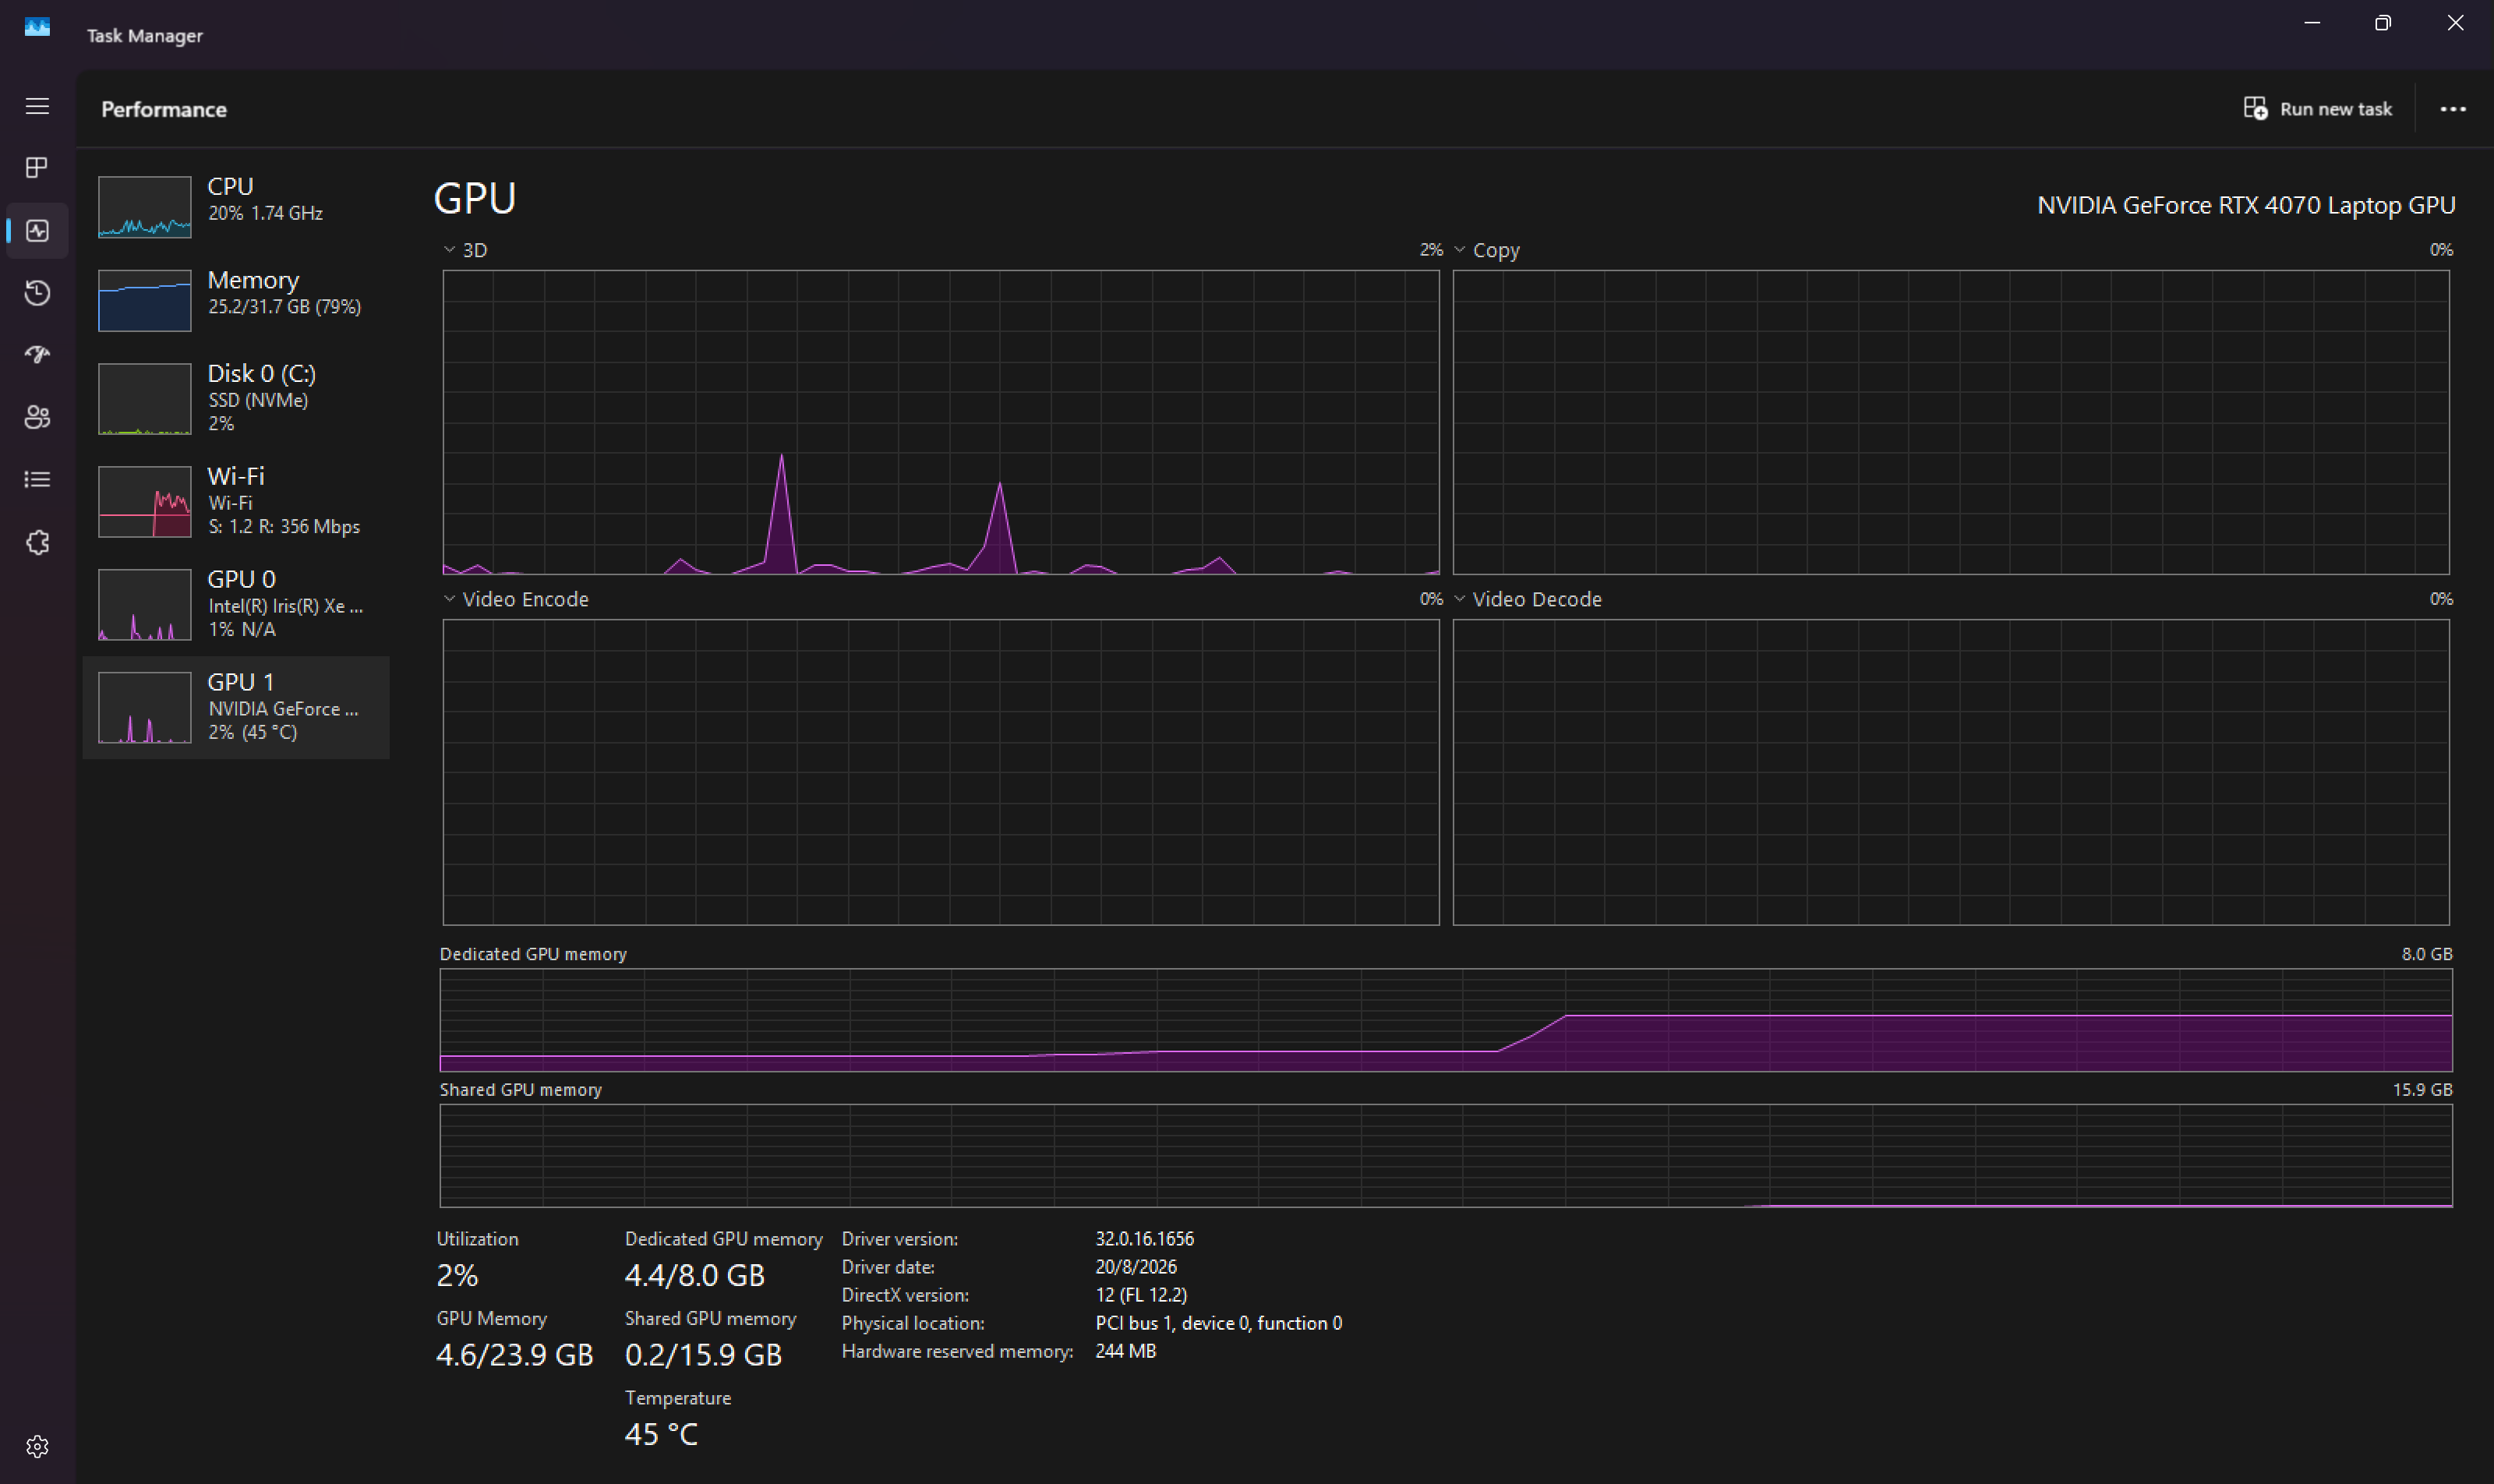
Windows Task Manager telemetry: 4.4 GB of 8.0 GB dedicated VRAM allocated to the WSL2 vLLM pod at 45°C.
Dedicated GPU memory held at 4.4 / 8.0 GB (in line with the --gpu-memory-utilization 0.7 setting plus desktop display overhead), with the GPU temperature at 45°C.
Beyond Local Dev: Why Production Clusters Use the NVIDIA GPU Operator#
For a single-node laptop or a Minikube sandbox, managing drivers on the host and running a standalone device plugin DaemonSet gets the job done.
In production Kubernetes clusters, manual node configuration does not scale. When you operate multi-node clusters across cloud providers or bare metal, nodes get provisioned dynamically by autoscalers, Linux kernel patch levels drift, and different GPU architectures (such as A100, H100, or L40S) coexist in the same cluster.
This is why production setups deploy the NVIDIA GPU Operator instead of managing the device plugin directly.
The GPU Operator automates the deployment and lifecycle management of the NVIDIA software stack required for GPU-enabled Kubernetes nodes. Driven by the ClusterPolicy Custom Resource Definition, it manages several components depending on your cluster configuration:
- Driver Management: Depending on the operating environment, the Operator can compile and load the NVIDIA driver container matched to the node kernel, or use pre-installed host drivers (common in managed Kubernetes environments like GKE, EKS, or AKS).
- Container Toolkit and CDI Configuration: Depending on the Operator version and runtime configuration, GPU injection can be configured through direct NVIDIA runtime integration or CDI-based device injection (Container Device Interface), which modern releases enable by default.
- Device Plugin Supervision: It deploys and manages the lifecycle of the NVIDIA Kubernetes Device Plugin DaemonSet, keeping it in sync with driver and runtime availability.
- Node Feature Discovery (GFD): It automatically detects physical GPU capabilities and labels each node (such as
nvidia.com/gpu.product: NVIDIA-A100-SXM4-80GBornvidia.com/gpu.family: ampere). Workloads can then target specific GPU models using standard KubernetesnodeSelectoror affinity rules. - Cluster Metrics with DCGM Exporter: It runs the Data Center GPU Manager (DCGM) exporter to collect metrics (GPU compute utilization, VRAM usage, temperature, power draw, and memory bandwidth) and expose them to Prometheus for cluster monitoring and alerting.
- MIG Management: On enterprise GPUs that support Multi-Instance GPU (MIG), the Operator can dynamically partition a single physical GPU into isolated hardware instances, allowing smaller workloads to share an A100 or H100 without memory interference.
In short: the device plugin provides basic GPU scheduling for pods. The GPU Operator manages the operational lifecycle, monitoring, and driver stack required to run GPU infrastructure reliably in production.
Key Takeaways#
- Docker Desktop Kubernetes isolates nodes without GPU passthrough: In tested setups,
desktop-control-planeruns in a nestedsysbox-runcsandbox without GPU device passthrough flags. - Minikube on native Docker CE in WSL2 works reliably: Launching Minikube with
--driver=docker --container-runtime=docker --gpus=allautomatically activates the NVIDIA device plugin addon. - Understand device plugin vs node prerequisites: The device plugin only manages discovery and Kubelet allocation. Host drivers, Container Toolkit, and runtime configuration must already exist on the worker node.
- Always size
/dev/shmin Kubernetes: Multiprocessing in PyTorch and vLLM quickly exceeds the default 64 MB tmpfs mount. Mount anemptyDirmemory volume backed by host RAM. - Budget VRAM carefully: Setting
--gpu-memory-utilization 0.7on a compact model like Qwen3.5-0.8B preserves headroom for the KV cache on an 8 GB GPU. - Deploy the NVIDIA GPU Operator in production: Production multi-node clusters rely on the GPU Operator to manage drivers, CDI device injection, node feature discovery, and DCGM monitoring.
Thanks for reading! If you run into issues setting up GPU passthrough on your machine, have questions, or have suggestions for other local AI setups to explore, leave a comment below.